Problem:
Your hardware music player plays audio files from a USB flash-drive (aka “USB stick”) in the “wrong” sequence.
Quick and Easy – Mac or Windows
If you just need a quick and easy fix for this, and are not interested in learning how to use a powerful scripting tool, then the video linked below provides a version of this work-around based on the free software “Picard”. Picard is a very powerful app, but it can be used for a “quick and easy” approach because it comes with a built-in dedicated tool for doing this kind of fix in a simple way.
The video is aimed at inexperienced Mac users – but is laid out in chapters so that experienced users can quickly skip to the bits they will need.
The final chapter provides a demo of the same fix working in a Windows environment.
MP3TAG Solution
The “bells & whistles” version of this fix uses the MP3TAG Editor on Windows. The information below will explain the problem and set you up to perform powerful script-based batch processing on ID3 tags inside audio files. If this approach is for you, then read on.
Please note that this page provides step-by-step instructions for fixing albums. If your requirement is to create personal playlists, then the tools and techniques described are still relevant, but you will need different scripts to handle custom playlists. Appropriate scripts for playlists are suggested in the Notes at the end of this page.
Just Checking!
It is important to just check that your player hasn’t accidentally got Shuffle mode enabled. (No, please, don’t laugh – there have in the past been reports of in-car music systems detecting that a paired device such as a smartphone is set in shuffle mode, and “deciding” to set shuffle mode for playback from all sources…!)
Which Order?
To find a work-around for the problem, it will first be necessary to discover the basis that your music player is using to decide in which order to play the songs. Whether your player is a hardware device or a software app, there are essentially three types commonly found:
(1) Playing alphabetically by filename.
This is not usually regarded as a “wrong” order, because MP3 music albums ripped from CDs or purchased as a set of MP3 files usually come with a sequence number already prefixed onto the filenames. People compiling personal playlists on a USB stick can easily append any desired sequence number to the front of the filenames of their song collection, in order to force the desired playback sequence in software (app) players which use this method.
(2) Playing by the order in which they were added to the USB stick.
Hardware MP3 players of the type sometimes found in older cars, or included in Hi-Fi system CD players, may simply scan the File Allocation Table from the USB flash-drive, and play the songs in the order in which it finds them in that table. That is the worst news, because all you can do to get around this is to avoid copying/pasting folders (or multi-selected groups of files), and build each folder by dropping songs onto the USB drive one-by-one in the order you want them to be played. Either that, or write your own batch processing that copies the files in a definite sequence.
(3) Playing alphabetically, by song title.
If you find that your music player plays the USB album tracks in alphabetic order of the song title (regardless of the numbers prefixing the filenames, and regardless of the order in which they were added to the stick) then please read ahead on this page.
Work-around for alphabetic playback (albums).
If you have the ability to process your MP3 music files on a computer, there is a work-around. Using a computer, you can process one folder/album at a time, or you can process files in bulk – your choice. Setting up a “script” to do bulk processing takes a little while, but after that it becomes really quick and easy to alter collections of MP3 files so they play in the desired order on the device. This guide takes you through step by step what to do.
Overview.
If you have got this far, then you have discovered that your music player is playing album songs not in order of the MP3 filenames, but in order of the ID3 Title tag that is embedded inside each of the MP3 files. The work-around involves altering that ID3 Title tag in your MP3 files such that a playback sequence number is prefixed onto the Title tag. Thus (for example) if the song “Space Oddity” is the first track on the album, then we will update its ID3 Title tag to become “01 – Space Oddity” (it doesn’t matter whether or not you include one or more spacing characters such as ” – ” provided that a natural sort order produces the desired sequence).
Any software that uses the ID3 Title tag to determine the play order will thus be “tricked” into playing the tracks in Track Number order instead. The (hopefully minor) downside of this work-around is that any device that displays the song title will show the adjusted version with its track number prefix. If your player has a browse function that shows a list of all songs, then such a list will no longer be useful – it will first list all the songs prefixed “01”, then all of the songs prefixed “02”, etc. But if that “all songs” view is not important to you (i.e. you listen mostly to albums, and only vary rarely want to manually select a single song out of your entire collection, than that may be a small price to pay.)
Additional Note 2025: I only recently had cause to consider the question: “What happens if you simply erase ALL of the ID3 metadata tags?”. So I tested this on a couple of hardware MP3 players – the one in my car, and the one in my front room CD/Radio. (By default, both of these devices would normally play MP3 songs in order of the ID3 Title tag.) Giving them a set of songs containing no metadata at all caused both devices to revert to reading the File Allocation Table, and so playing songs in the order in which they were written to the USB drive.
Prerequisites for the Workaround.
Obtain a copy of the software MP3TAG for windows or Mac. Install it on your computer. (For Windows there is a portable installation available – it will not alter your Registry.)
( Please note that I am just a fan of MP3TAG, I am not associated with the developer, Florian Heidenreich who is based in Dresden, Germany. Support for MP3TAG is available here: https://community.mp3tag.de/ )
Place a copy of the MP3 music files that you want to alter in a directory/folder. (I suggest – at least initially – working on a copy just in case you make a mistake and change things that shouldn’t be changed!)
Procedure – First Time Through.
We go through this part of the process one time. Having done that, a “script” is established and saved, so that on the second and future usage occasions, you will be able to very quickly process any group of MP3 tracks using fast keyboard shortcuts. (It is possible to import a script file into MP3TAG, but in the time it takes to do that, you can learn how to create them. That way, you can easily create or modify any script for your own purposes.)
To begin:
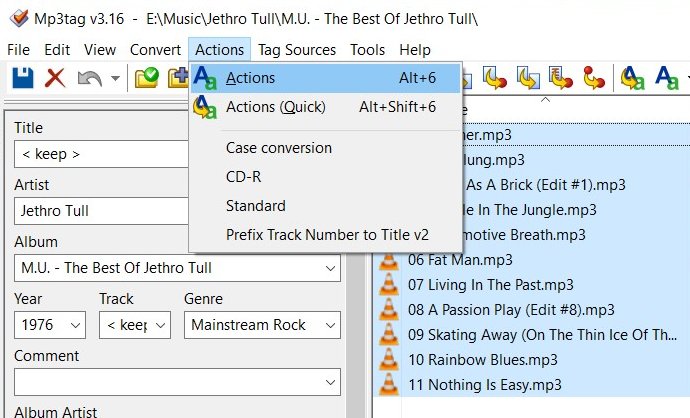
- Open MP3TAG and use the Change Directory function to point to the folder containing the MP3 tracks that you want to process. (I am going to include screen snapshots from the Windows version that I use.)

This will display the MP3 tracks in that folder. If you wish, you can select a higher level directory/folder. If you do, then all the tracks below that level in the folder structure will be displayed, so you could (for example on later runs) process all albums by the same artist in one go. Or group the folders how you like for bulk processing.

The columns we are interested in are Filename, Title (aka “Song Title”) and Track (aka “Track Number”). You can now see the essence of the problem. Even though the Track Number is available to be used, and even though the Filename is already prefixed with a Track Number, the MP3 player uses the data from the ID3 Title tag to decide in what order to play the tracks.
Setting Up The Script.
MP3TAG calls scripts “actions” – so we need to first set up an Action. You only need to do this one time for each script.
- Type CTRL + A to select all tracks. (This step may seem curious, but it is necessary, since the Actions menu will be greyed out unless there is a valid target for such Actions.)
- Select the Actions from the menu tab, or type the shortcut ALT + 6.
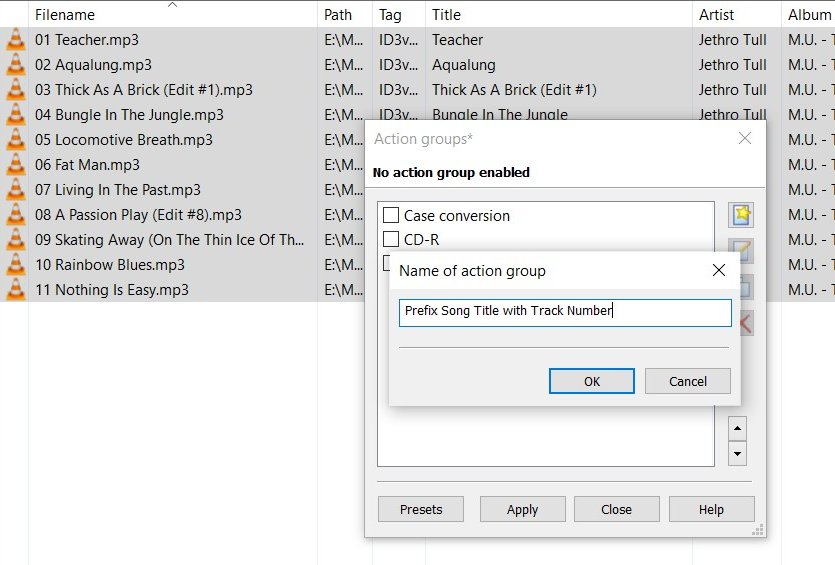
An Action Groups panel will pop up:

- Select the star icon at top-right of the Action Groups panel to create a new Action. Another panel will pop up asking you to name the new Action.
- Name it something like “Prefix Song Title with Track Number”.
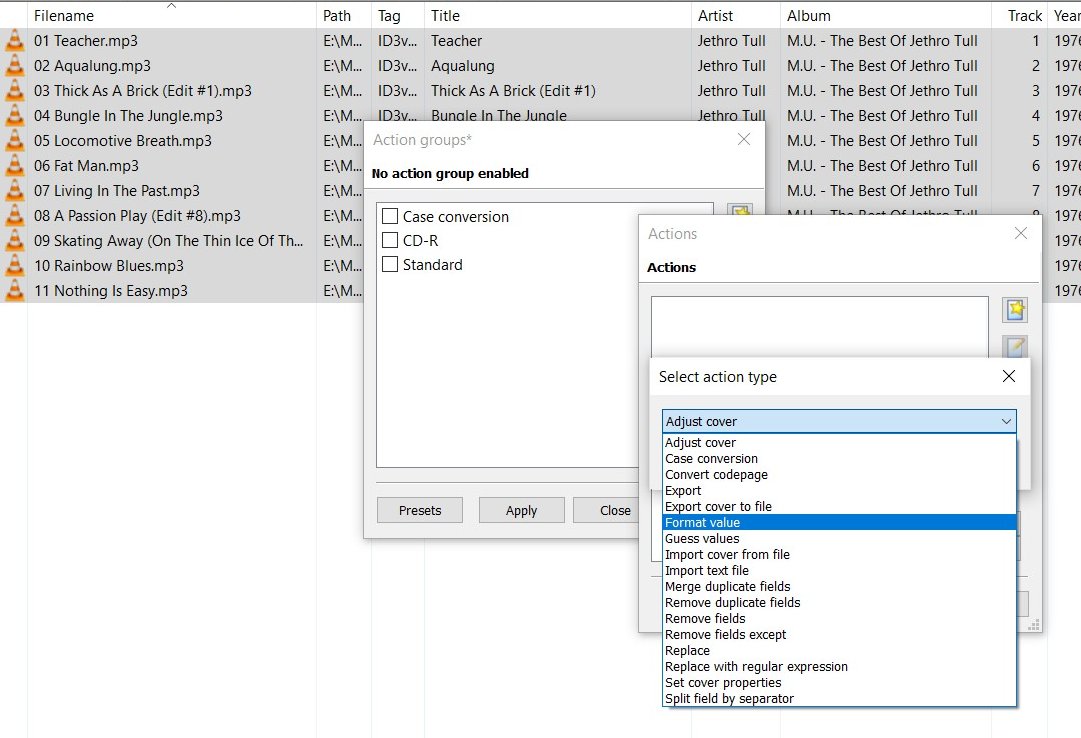
- Click OK, then the Actions panel will pop up. There are no Actions listed.
- Click the star symbol again to access a list of possible Actions.
- Select the Action you want – choose Format Value.
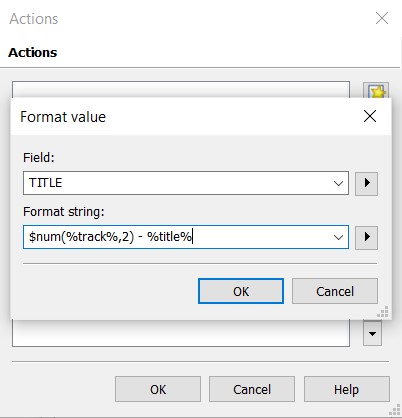
- A third panel pops up for you to actually specify the details of the Format Value Action you are creating.
- From the Field list, select TITLE. (this is the MP3 tag we wish to alter.)
- Then enter the a Format string (you can cut and paste it from the Notes at the end of this page.)
- Select OK. then OK again. This has added your new Action to the list.
- You have not yet ticked the box to activate it, but that can come later – for now we are just establishing the Action for future use.
- For now, just Close the Actions panel. It will prompt you to save the configuration.
- Select Yes.
Optional:
If you wish to set this script as the default enabled Action every time you use MP3TAG, then either before saving as above, ensure that it is the only Action with a tick in its box – or alternatively, to set it as a default anytime – just open the Actions panel and ensure that it is the only Action enabled before closing.

That completes the setting up of the script.
Using The Script.
To use the script:
- Open MP3TAG and:
- Change Directory to a folder that contains all of the MP3 files you wish to process.
- CTRL +A to select all files.
- ALT +6 to line up the pre-defined Action you wish to use.
- ENTER to confirm
- CTRL +S to save the changes.
Result.
If your script has worked correctly, the MP3TAG track list will now display the Title tag column as having the Track Number prefixed on to it :

Notes on the Script.
The Format String to use for fixing albums is:
$num(%track%,2) - %title%
Note that the ” – ” (space hyphen space) in the script is the separator that you require – it can be just a single space, or anything you like.
Alternative Scripting Ideas
If you have created a personal playlist, by copying songs from various sources into one folder, then the filename prefixes may initially reflect the track list from the source album, and they won’t make sense as a play order, and copying them to the ID3 Title tag (as for albums above) won’t work.
Playlists:
A workaround for playlists is to firstly edit the prefix numbers on the front of each filename to reflect the sequence in which you want the list to play – then you can use these scripts (or something similar):
1) Replace the Title tag with the whole of the (now edited) filename:
Guess values "%_filename%": %title%
If you wish to create consistency in the ID3 tags, you may wish to also replace the original track numbers to reflect the new sequence:
2) Replace track numbers with the first 2 digits found in the filename:
Guess values "$num(%_filename%,2)": %track%
(Note: Here we are using the Guess values action rather than the Format value action, because Guess Values offers us access to the filename – which is not an ID3 tag.)

Hi Peter – a big THANK YOU for the detailed steps – this worked perfectly! I can’t believe Toyota never bothered to get this fixed 😦
LikeLike
You are very welcome! So glad you found it useful. P.
LikeLike
I was thrilled to find this as my Kia also sorts alphabetically but I’m not getting the pop up to select the type of action so it’s not working for me. Any idea how to add that manually?
LikeLike
Kia Kay, I had the same problem. Press the star again and the types menu will come up.
LikeLike
Thank you so much Richard, for spotting that omission error in the instructions. I have now updated that section.
LikeLike
Thank you both. I’ve been meaning to find back to update that I did manage to get it work but of course now I can’t remember what I did….but that suggestion runs a bell.
Didn’t solve all my problems and I’ve ended up using Car Play, which I was trying to avoid but still have the USB as a backup!
LikeLike
No problem. Thanks for the fix. This has bothered me for years. If I searched by folder it worked fine since I had already added the track number to file names, but not I can search by album and have it work correctly.
LikeLike
never again will i be plagued with out of sequence albums. Many thanks for clear instructions
LikeLike
Just got a new company car (Seat Leon) with this same very annoying song title issue. Never knew that you can make your own scripts in Mp3Tag.
Thank you a thousand times for this great instruction!
LikeLike
USB thumb drives created using later mac os computers when writing to a usb thumb drive will randomly write the files to the usb thumb drive causing out of order playback even when numberered 01..02 etc. The way to insure to have playback order correctly just create the folder on the thumb drive with a friendly name for your cd being copied and then in the folder copy the songs one at a time to the created folder on the thumb drive in the order of playback on the cd. Thumb drives have the crazy habit sometimes playing which files were copied first to the thumb drive and will randomly pick when copying a bunch of songs in groups of songs causing the playback being out of order. Taking the time to copy one at a time in the correct order resolves this problem no matter the player.
LikeLike
Or, there’s this program…
http://www.anerty.net/software/file/DriveSort/
LikeLike
Worth knowing about, Marty – thanks. Personally, I wouldn’t feel comfortable directly editing the volume directory tables (even on a USB stick !) Also, would I be correct in thinking that the only way to use DriveSort sorting in MP3 Track Number sequence would be to individually drag and drop each filename manually into the position you require?
LikeLike
It seemed to work for some of my albums, but not others… very strange. Did anyone else have this happen to them?
LikeLike
I bought a new MP3 player from Best Buy with no company name. I tried all the stuff of naming files in an album or chapters in a book and nothing worked.
Finally I clicked ‘reset’ and all is well. I didn’t even lose the material I’d copied to the unit.
Thanks for the ideas.
LikeLike